Wednesday, 27 March 2019

Revolution: environmentally conscious design in plastics

We have recently opened our latest exhibition, Revolution: environmentally conscious design in plastics. It is an exhibition that has been inspired by the devastating images of plastics waste in oceans and streets, and is our way of highlighting the value of a material group that is so easily discarded.

We start by thinking about ‘single-use’ becoming Collins Dictionary’s word of the year in 2018 and how they define the word as being strongly associated with plastics. MoDiP wants to acknowledge that objects made of plastics that are in the wrong place, doing the wrong thing, and being disposed of without care, are indeed problematic to the environment. This has meant that plastics have become synonymous with the term ‘single-use’ and with environmental devastation; as well as the depletion of fossil fuel stocks, despite plastics being responsible for only 4% of crude oil usage.

Revolution aims to redress the balance by exploring environmentally conscious design in plastics. It looks at the use of recycled and upcycled materials, alternative sources of raw material feedstocks, and some of the ways in which plastics objects can actually help to prevent environmental damage.

Some of the highlights in the exhibition are the upcycled and recycled products made from a variety of interesting starting points. For example, a dinghy which has been made into a bag, milk bottles that have been made into building blocks, chewing gum that has become a collection bin, and toys that have been turned into a storage box. 


Top row l-r: Inflatable Amnesty bag, Wyatt and Jack, 2018. AIBDC : 008202. Blocks, Green Toys, 2011. AIBDC : 006138. Bottom row l-r: Gumdrop bin, Gumdrop, 2016. AIBDC : 007949. Kiwi, ecoBirdy, 2018. AIBDC : 008170. Image credit: MoDiP.


Increasingly, when plastics are mentioned in the media, it is to report on the environmental damage that they cause. However, plastics can be used to play important environmentally supportive roles. One case in the exhibition, Plastics for good, looks at just a few of the examples of plastics products helping to preserve the environment. The most poignant object being the fence boom, a piece of plastic designed to go in waterways to prevent further contamination. 


Fence boom, Darcy Spillcare, 2019. AIBDC : 008199. Image credit: Darcy Spillcare 

In the Revolution exhibition, we are also exploring the difficult concept of ‘bioplastics’ and what is meant by the term. Bioplastics is confusingly used to mean either a material that is produced from a recently living organism known as biomass, as opposed to those that lived many millions of years ago and consequently creating fossil fuels, as well as materials that will biodegrade. However, not all plastics made from biomass are biodegradable, and not all fossil fuel based plastics are not biodegradable.

It is generally thought that using materials that are made from biomass and/or are biodegradable is the answer to the waste issue that the world is experiencing at the moment. Yet, the bigger picture shows that these materials are not without their faults. Growing crops to make biomass for plastics diverts land from growing food for livestock and people; the compostable waste infrastructure is not in place to take biodegradable materials that need industrial settings to degrade properly; if these materials go in the recycling system they can undermine the resultant output; and finally if they end up in landfill they can produce methane, a greenhouse gas, as they breakdown. Creating products out of biomass and biodegradable material is one-step in the journey to reduce the impact on the environment, we just need refuse and waste infrastructures around the world to catch up.

Revolution runs from now until 6th September we hope you can come and see the real thing but if not you can view the whole exhibition on our website.

Louise Dennis, (Curator of MoDiP)

Wednesday, 20 March 2019

Student Creative - Animation team


Our Project aim: 3D print and construct a Zoetrope, see our last blog post for our initial plans (http://museumofdesigninplastics.blogspot.com/2019/01/student-creative-animation-team.html


fig. 1 - A Zoetrope

MoDiP – font of all plastic inspiration 

The collection at MoDiP has allowed us to see familiar objects in new ways. I particularly recall the feeling of seeing a milk carton in an entirely knew light, when I saw it in the ‘See Through’ exhibition at MoDiP. (https://www.modip.ac.uk/artefact/aibdc-007141)

We want to do the same for animation. Taking a familiar art form that most people see everyday in one form or another, and making you take another look – making you think again.

Utilising the phenomenal ability of plastics, to help us keep order to the chaos of the world around us, is exemplified in the Tupperware display MoDiP is 
currently showing. (https://www.modip.ac.uk/artefact/aibdc-005464). Tupperware can keep all manner of things separate and keep important substances apart. 

Our response to this is to create a 3D plastic printed animation displaying the chaos of disorder, which only becomes clear motion once a flashing light and rotating table are added. For us animation is the chaos in which only 3D printed plastic and a rotating table can find order.

The Team – An evolution

Our initial team of ten has slimmed down as members of our 2nd year animation CG pathway have made decisions to leave CG work behind. However, 3rd years interested in the project have stepped in to join us to produce this project. As we currently stand the team is:

Producer: Jonny Strutt
Supervising Director: Merlin Voss
Animator: Sam Elphick
Assistant Modellers/Riggers/Animators: Calum Avery, Mitchell Shilling, Ciara Davis
Supervising Lecturer: Ian House

Where the project is now:
 
fig. 2 - GIF of the line test done for the animation

The zoetrope has moved along the pipeline of production well. The conventional parts of the 3D animation process (line tests, modelling, rigging, and key-posing) have been relatively smooth.

fig. 3 - Rigging and modelling progress shot

However, one key element of the rigging process called ‘Weight Painting’ has been a cause of some grief. Without it, the skeleton constructed during rigging would move independently of the model, leading to no animation. Not much help. When it is done badly, or as in this case, it is the first time using the tool, the model can not only animate badly, but break apart entirely. The loyal cart horse that is the phenomenally complex computer code behind 3D animation can easily buck and takes quite some calming down if it does. 

fig. 4 - pictures of broken weights

However, once a few pose tests were done, and the tool was grasped, the rigging was complete and the animation could progress smoothly to its eventual conclusion: a shot of a character viewed from one side only, as dictated by the filmmakers.

fig. 5.1 - Picture of fixed weights
fig. 5.2 -  Animation GIF

Bringing the animation into a 3-dimensional space will allow an audience to see and enjoy the subtleties of the animation from any angle they can crane their neck to see. This prospect excited me greatly, as when animating in CG I have often found ‘animating to the camera’ has caused the work to look good from one angle alone, so when moving around the animation in virtual 3D space, it suddenly looks much less effective. (On more than one occasion legs have been stuck at bizarre angles simply by virtue of being off screen and therefore irrelevant to the film.) 

Displaying animation in such a way as to be able to look at the whole body, from any side, has forced me to improve my animation. The overall movement must read from any angle, the arcs need to work in a 3D space, no longer just a 2D plane, and the action has to read clearly from as many angles as possible. It is no longer animating on a virtual set, it is animating on a virtual theatre stage with a mobile audience.

fig.6 - Models placed on the virtual zoetrope

fig. 7 - Zoetrope GIF test

From here more characters will be added around the one I have done, by the other members of the team following the same process as myself.

The next stage – Virtual to Reality

A good chunk of the usual process is complete. Now the transition begins - breaking the veil of Maya, pulling the curtain back between the illusion of the virtual world and the tangibility of reality is all that’s left to do. Simple.

The plan is as follows:

1. 3D print the ‘frames’ of animation as individual models using the wonder material that is plastic.

2. Clean the models of any unforeseen elements of the printing process.

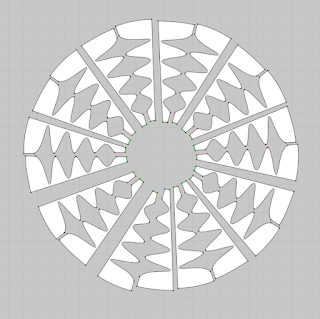
3. Laser cut a disk for the models to slot into perfect alignment for the animation. [see fig. 8 below of the plan for cutting.

4. Put the parts together on a turntable using nuts and bolts.

5. Add the motor and flashing lights.

6. Watch the models come to life in an exhibition space.

fig. 8 - template for model placement

Each stage may pose new problems as this is the key challenge of the project – getting an animated performance sculpted in three dimensions. This challenge we will take one step at a time.

Taking on a challenge is what animating is all about, we wouldn’t do it if it was easy.

Written by Jonny Strutt

Wednesday, 13 March 2019

Student Creative - Adalheidur Agusta Jonsdottir

When making a pattern it can be interesting to use shapes from real life. The bowl that I used as my inspiration had a lovely bubbly shape to it. 

At first, for my Final Major Project, I was going to use Lectra - a pattern cutting software - to make the skirt. Then I started playing around with another pattern cutting software called Clo3d. I realised that the 3D virtual avatar in Clo3D, is much more realistic than the Lectra avatar. 


Image credit: Adalheidur Agusta Jonsdottir


Image credit: Adalheidur Agusta Jonsdottir

Image credit: Adalheidur Agusta Jonsdottir

Image credit: Adalheidur Agusta Jonsdottir


Out came the shape I was looking for, and I am happy with how it moves when I make the Avatar move. 


Image credit: Adalheidur Agusta Jonsdottir

Image credit: Adalheidur Agusta Jonsdottir

Image credit: Adalheidur Agusta Jonsdottir

Image credit: Adalheidur Agusta Jonsdottir


Since this is a virtual reality project, I want to make not only the skirt, but a top to go with it. For my final outcome I am going to have an outfit on virtual reality, that represents the inspiration I got from the MoDip museum. 

Adalheidur Agusta Jonsdottir - Student Creative

Tuesday, 5 March 2019

Student Creative - Fiona McTaggart

The last couple of months have taken me on a journey of discovery, in pursuit of making my heroic doll for paediatric cardiac patients. Recently this has seemed even more pertinent as February has been ‘heart month’ with social media flooded with stories from those waiting on the transplant list or having come through it, all emphasising the importance of organ donation. Moreover, ‘Max & Keira’s Law’ has been granted and will come into effect in England next year. An ‘opt-out’ policy for donor donation will replace the current ‘opt-in’, with the hope that there will be an increase in organ donation, as has already been seen in Wales (https://www.bbc.co.uk/news/health-47359682). For those unfamiliar with the background of this law, Max received his life-saving heart transplant from a young girl, Keira, who died tragically in a car crash. The brave and selfless act of her parents at such a difficult time meant that Keira was able to save four lives through organ donation, including that of Max. 

Heart Awareness Month, Max & Keira's Law

Although my overall intention is to provide an educational and positive doll for children suffering with heart conditions, time constraints have meant that I have focused specifically on creating a doll that will have an interchangeable heart that illustrates heart transplantation or heart improvement through medical management. Practically, I have been very fortunate to have had the help of Ben Diamond, AUB Technician Demonstrator. Without him, I think I would have struggled to get to the place that I am currently. So, what have I achieved so far? I designed my first doll, based on some heroic poses of my son. 

Doll designs. Image credit: Fiona McTaggart

I then modelled him from polymer clay. This medium is very appropriate for this project as it is made from a plastic PVC base and perfectly suits my intentions for casting in resin. This was the first time I had used this product and initially I found it easy to model, however it soon became too soft and difficult to keep its form, especially when I attached the torso to the legs. A few YouTube videos later and I learnt that you can harden it in the freezer for a short while, to prevent it becoming too soft to work with. I completed my figure and made a small anatomical heart to insert into the heart-shaped space I had created in the torso. Unfortunately, I did this a bit too big so will have to consider this in my next, and final design.

Polymer clay figure.  Image credit: Fiona McTaggart

Once baked and hardened in the oven, I made my silicone mould (another rubberlike plastic medium) and utilised the expertise and resources of the model-making workshop to cast my model in resin. This is quite technical, and I hadn’t anticipated this being the most difficult aspect of the project.


Silicone mould.  Image credit: Fiona McTaggart

My first attempt resulted in a resin figure filled with bubbles and unevenly dispersed colour resin powder. The heart was ok but still contained some bubbles. On Ben’s advice, I decided to use a slower setting resin that would allow time for the bubbles to rise and disappear. This did work much better although, with the bubbles disappearing, the resin sunk, and the feet of the figure were not filled fully. Despite this, the quality of the resin was much better, and I now feel confident to create a new design and figure. I might simplify the design and also refrain from using an iridescent resin powder, preferring the clarity of a colour tint instead. I also intend to simplify the facial features as the detail was not so effective in resin. I hope that the translucent figure will complement the more opaque heart/s and intend to use magnets to make these interchangeable. My intention would be for this doll to be placed by a child’s bedside, perhaps with a table lamp lighting up the figure and projecting a sense of hope at a time of uncertainty. 


Resin figures. Image credit: Fiona McTaggart
 
Hearts. Image credit: Fiona McTaggart


Fiona McTaggart, Student Creative